When I think about doughnuts, my mind drifts to the warm coffee shop down the street. The aroma of fresh coffee fills the air, inviting me to take a seat and indulge. Homemade glazed doughnuts can effortlessly elevate your morning routine.
Pair these sweet treats with a steaming cup of coffee or a cool glass of milk. How about an invigorating herbal tea to accentuate the sweetness?
For a more adventurous pairing, try serving them with some freshly squeezed orange juice. The citrus complement will dance beautifully with the doughnut's flavor.
Are you planning a brunch? Arrange a fruit platter alongside your glazed delights. Add strawberries, blueberries, and slices of apple to create a refreshing balance.
For a more festive occasion, consider making a simple fruit compote or berry sauce to drizzle over the doughnuts. The colorful addition will not only look appealing but also add a burst of flavor with every bite.
Ready for an adventure in the kitchen? Let me take you on a delightful journey of homemade glazed doughnuts. These doughnuts are not just a treat; they’re a delightful experience that brings joy to the table.
What is Homemade Glazed Doughnuts?
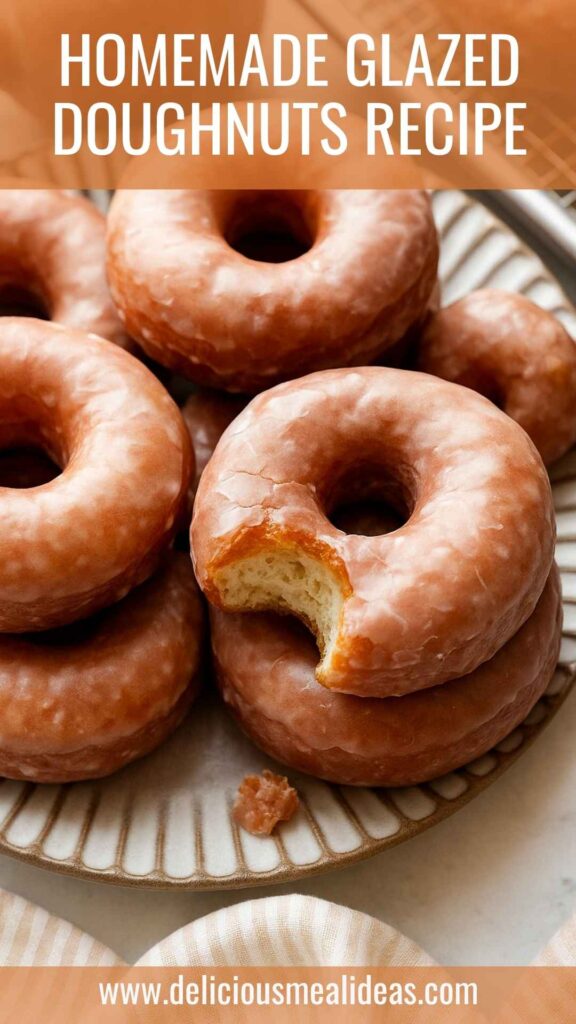
Homemade glazed doughnuts are fried pastries that embody fluffy, yeast-leavened perfection. They are usually round with a hole in the center, but that’s not a strict rule.
They come topped with a sweet glaze, which is often made from powdered sugar and cream, resulting in a soft, shiny finish that invites bites.
The beauty of making doughnuts at home lies in the control over ingredients and flavors. You can experiment with flavors and textures that supermarket options often lack. Plus, the joy of crafting each doughnut with your hands adds to the experience.
These doughnuts are often enjoyed at breakfast or as an afternoon snack, but trust me— they’ll make an impression at any gathering.
What Makes This Recipe Different From Other Homemade Glazed Doughnuts?
What sets my recipe apart from others? The secret lies in a few special touches. First, we use freshly grated nutmeg and a hint of orange zest that infuse warmth and depth into the dough. Many recipes skip out on these nuances, but they truly elevate your doughnuts to a new level.
Another standout feature is the use of yeast. This method creates a soft, airy texture rather than a dense one. Rapid-rise yeast means no waiting around for hours; you can enjoy your homemade doughnuts without the lengthy rise times typically involved.
The glaze is also crafted with care. While many people settle for a basic sugar glaze, ours includes a touch of real vanilla. This adds another layer of richness that will have you raving about these doughnuts long after they’re gone.
How Does It Taste?
Imagine sinking your teeth into a warm, fluffy doughnut. The outer glaze is sweet yet balanced.
Each bite reveals a soft, pillowy interior that almost melts in your mouth. The nutmeg and orange zest add subtle, aromatic notes that enrich the overall flavor of the doughnut.
This isn’t just dessert; it's comfort food at its finest. Pair it with that morning coffee, and you’ll feel like you're in a cozy café. It's a simple pleasure, yet each mouthful brings an avalanche of joy.
Ingredients You'll Need To Make This Dish:
Dough Ingredients:
2 and 1/4 teaspoons rapid-rise or traditional dry yeast
1/4 teaspoon freshly grated nutmeg
4 cups plain all-purpose flour, with extra for dusting
1 cup warm whole milk
1/3 cup white sugar, split into portions
1/2 teaspoon fine sea salt
2 large eggs, at room temperature
6 tablespoons melted unsalted butter, slightly cooled
1 teaspoon real vanilla extract
1–2 quarts neutral frying oil
1/2 teaspoon ground cinnamon
1 teaspoon orange zest
Glaze Ingredients:
1/3 cup heavy cream, or substitute with whole milk or half-and-half
2 cups powdered sugar, sifted
1/2 teaspoon vanilla essence
Step by Step Instructions
Step 1: Make the Dough
Start by activating your yeast. In a large bowl, combine warm milk and 1 teaspoon of sugar. Sprinkle the yeast on top and let it sit for about 5 to 10 minutes until it's frothy. This lets you know the yeast is alive and ready for action!
Step 2: Mix Dry Ingredients
In a separate bowl, whisk together the flour, nutmeg, cinnamon, and salt. This ensures even distribution of these flavors throughout the dough.
Step 3: Combine Ingredients
Once your yeast is frothy, stir in the remaining sugar, eggs, melted butter, and vanilla extract. Gradually pour the dry mixture into the wet ingredients, mixing until a soft dough forms.
Step 4: Knead the Dough
Flour your work surface and turn out the dough. Knead it for about 5 to 7 minutes until it becomes smooth and elastic. You want that dough to feel alive and ready to rise!
Step 5: First Rise
Place the dough in a greased bowl, cover it with a damp cloth, and let it rise in a warm spot. It should double in size within 1 to 2 hours. This is the time to dance around your kitchen, maybe put the radio on!
Step 6: Shape the Doughnuts
Once the dough has risen, punch it down to release the air. Roll it out to about a half-inch thickness. Use a round cutter to make circles and a smaller cutter for the center holes. Gather the scraps, knead them, and cut more doughnuts.
Step 7: Second Rise
Place the cut doughnuts onto a parchment-lined baking sheet. Cover them again and let them rise for another 30 to 45 minutes. You’ll notice they grow in size, which is a good sign!
Step 8: Heat the Oil
In a large, deep pot, heat the neutral oil on medium heat. You want the oil to reach 350°F (175°C). If you don’t have a thermometer, drop a small piece of dough in—if it sizzles, it’s good to go.
Step 9: Fry the Doughnuts
Carefully add doughnuts to the hot oil, a few at a time. Fry until golden brown, about 1 to 2 minutes per side. Use a slotted spoon to lift them out and place them on paper towels to drain excess oil.
Step 10: Make the Glaze
While the doughnuts cool, whisk together the heavy cream, powdered sugar, and vanilla in a bowl until smooth. The consistency should be thick but pourable.
Step 11: Glaze the Doughnuts
Once the doughnuts have cooled slightly, dip the tops into the glaze. Let any excess drip off. Place them on a cooling rack to let the glaze set.
Step 12: Enjoy!
After the glaze sets, your doughnuts are ready. Serve them fresh, and watch them disappear!
Tips & Tricks On Making Homemade Glazed Doughnuts
- Don’t Rush the Rising: Allowing the dough enough time to rise is crucial. If it doesn’t rise properly, the doughnuts won't be light and airy.
- Temperature Matters: Ensure your frying oil is at the right temperature. Too hot, and they’ll burn; too cold, and they’ll soak up oil.
- Use Fresh Ingredients: Fresh yeast makes a difference. Test the yeast with warm milk before using to ensure it's active.
- Flavor Variations: Get adventurous! Add chocolate, caramel, or different flavorings to the glaze or dough for new twists.
- Fill the Doughnuts: Consider filling the doughnuts with cream, jelly, or even custard after frying. It’s a fun surprise!
How Do I Store This Dish?
Once you’ve made your doughnuts, they are best enjoyed fresh. However, if you have leftovers, here’s what to do:
- Room Temperature: Store in an airtight container for 1 to 2 days at room temperature.
- Refrigeration: Not ideal due to possible staleness, but if necessary, they can last for up to a week in the fridge.
- Freezing: To extend shelf life, freeze them without glaze. Place them in a freezer-safe bag, and they’ll be good for up to three months!
When you’re ready to enjoy, simply thaw and glaze!
What Other Substitutes Can You Use in Homemade Glazed Doughnuts?
Finding alternatives in your kitchen can be incredibly useful. Here are some substitutes you might consider:
- Unsweetened Applesauce Instead of Butter: Works as a substitute for a lighter alternative.
- Non-Dairy Milk for Whole Milk: Almond or oat milk can replace whole milk without sacrificing flavor.
- Agave Syrup for Granulated Sugar: A great option for those avoiding refined sugar. Adjust for sweetness levels.
- Nutmeg and Cinnamon: If you don’t have fresh nutmeg, try using ground. Remember, it packs a punch, so use a bit less.
- Vanilla Bean Paste or Extract: This can enhance the vanilla flavor in both the dough and glaze.
Conclusion
Creating homemade glazed doughnuts is not just an activity; it’s an experience filled with aromas, flavors, and the joy of craftsmanship. The process might take some time, but I promise it will be worth it.
Sharing these soft and sweet delights with family or friends will create unforgettable moments.
So, roll up your sleeves and get ready to make some magic in your kitchen. Indulge in these treats and watch the smiles appear around your table. Happy baking!
You’ll also like the following recipes!