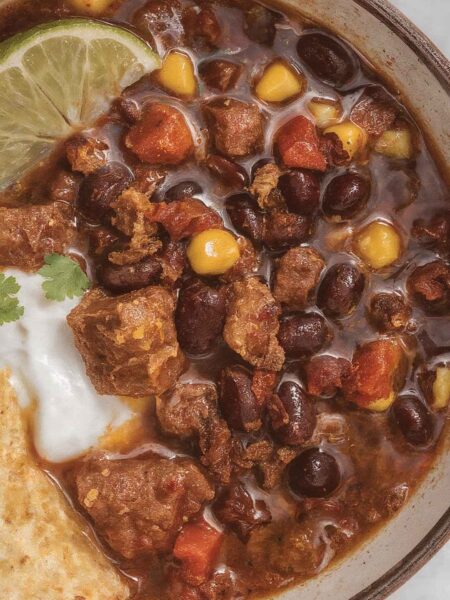
Before we dive into the enchanting world of loaded nachos, let’s talk about what you can serve alongside them to elevate your experience. Think about creamy guacamole—it’s a match made in foodie heaven. You could also whip up some delightful jalapeño poppers.
They offer a delightful kick that pairs beautifully with the cheesy goodness of nachos. And let’s not forget about a chilled beer or a zesty margarita. A good drink can perfectly complement the flavor explosion that awaits you.

The Cheesy Tale of Loaded Nachos
Have you ever come home after a long day and thought to yourself, “What could possibly make this day better?” For me, the answer is clear: loaded nachos. As I sink my fork into the pile of crispy chips, melted cheese, and colorful toppings, something magical happens. It’s more than just a snack; it’s an experience that transforms even the blandest days into something special.
Loaded nachos have evolved from simple chips and cheese into a canvas for creativity. Whether it’s game day or a casual night in, you can never go wrong with this dish. Believe me, I’ve taken my fair share of culinary adventures, and nachos never fail to deliver.
What Are Loaded Nachos?
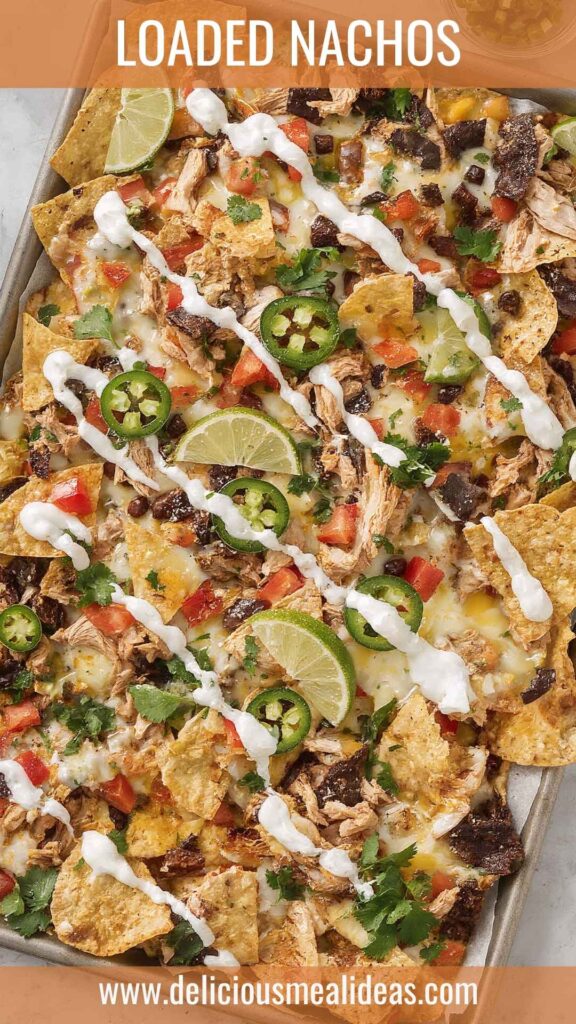
Loaded nachos are essentially tortilla chips covered in a variety of toppings. The foundation usually includes gooey cheese, maybe some seasoned meat, and a medley of additional ingredients like beans, salsa, and vegetables. The beauty is that you can customize your nachos to suit your taste. Just like a blank canvas, they invite you to express your culinary preferences.
How Does It Taste?
Close your eyes and imagine this: the crunch of tortilla chips gives way to layers of melted cheese, meat, and fresh toppings. The flavors dance on your tongue. The creaminess of the melted cheese balances the zestiness of the salsa while the crunch of vegetables adds a refreshing contrast.
You can taste the smoky undertones of the spices, alongside the cooling notes from fresh cilantro. It’s a delightful medley of sensations that keeps you reaching back for more.
Why You’ll Love This?
Loaded nachos are the kind of dish that brings people together. With every bite, you’ll enjoy a mix of textures and flavors. Plus, they’re incredibly easy to assemble. Whether you’re a novice cook or a seasoned chef, nachos offer a level of versatility that seems to cater to everyone’s palate. Plus, who doesn’t love cheese? It’s like the glue that holds this delightful dish together.
Ingredients
Let’s gather the essentials. Here’s what you’ll need to create this masterpiece:
- 1 boneless, skinless chicken breast, cooked and shredded
- 1 tablespoon taco spice mix
- 2/3 cup canned black beans, drained and rinsed
- 2/3 cup chunky salsa (or your preferred variety)
- 3 cups shredded Mexican-style cheese blend
- 8 ounces crispy tortilla chips
- 4 green onions, thinly sliced and separated
- 1/2 cup roasted corn kernels
- 1/4 cup fresh cilantro, chopped
- Pico de gallo
- Toppings as desired (think sour cream, jalapeños, avocados)

Step-by-Step Directions
Step 1: Prepare the Chicken
First, you will cook and shred the chicken breast. This step is crucial because it sets the foundation for the flavor. Use a tablespoon of taco spice mix while cooking—it really amps up the taste. Whether you bake, grill, or pan-sear, make sure it’s cooked thoroughly. Once ready, shred it with two forks. Set it aside for now; we’ll come back to it shortly.
Step 2: Preheat Your Oven
Preheat your oven to 375°F (190°C). A hot oven is essential for melting the cheese to perfection.
Step 3: Assemble the Base Layer
Grab a baking dish or sheet. Scatter the crispy tortilla chips evenly on the bottom. You want a generous layer that will support the toppings.
Step 4: Add the Chicken and Beans
Next, evenly distribute the shredded chicken over the chips. Follow that with the black beans. They add a nice protein boost and texture.
Step 5: Layer on the Salsa
Spoon the chunky salsa all over the top. This gives everything a flavorful kick and moisture that brings it all together. Sprinkle with the green onions and roasted corn—for extra crunch and a pop of color.
Step 6: Add the Cheese
Now, the star of the show: cheese. Pile on that shredded Mexican-style cheese blend. Go generous! It’s nachos after all.
Step 7: Bake the Nachos
Place the dish in the preheated oven. Bake for about 10–15 minutes, or until the cheese is nice and bubbly. Keep an eye on it—you want it perfectly melted, not burnt!
Step 8: Finishing Touches
Once your nachos are out, sprinkle the fresh cilantro on top. Add pico de gallo for freshness. Top with your desired additional toppings like sour cream, sliced jalapeños, or diced avocado.
Step 9: Serve Hot
Dig in while it’s hot. Grab a fork—or just dive in with your hands. Either way, enjoy!
Tips on Making Loaded Nachos
Choose Quality Tortilla Chips: The foundation matters! Go for sturdy chips that can hold up under pressure.
Don’t Overload: While it’s tempting to pile on more, too many toppings can lead to a soggy mess. Balance is key.
Use Fresh Ingredients: Fresh salsa and ripe tomatoes reflect well in taste. Opt for seasonal produce when possible.
Swap Cheeses: Experiment with different cheeses. Pepper jack adds a spicy kick, while cheddar provides a classic touch.
Make it Ahead: You can prep your toppings in advance. Store them separately and assemble just before baking!
How Do You Store Loaded Nachos?
If you find yourself with leftovers (though that’s rare), here’s how to store them:
- Cool Down: Let the nachos reach room temperature before storing.
- Airtight Container: Use an airtight container to keep them fresh.
- Refrigerate: They can last for about 2-3 days in the fridge.
When Reheating
Oven Magic: Reheat in the oven at 350°F (175°C) until warmed through.
Microwave: If you’re in a hurry, the microwave works, but expect a softer texture.
What Other Substitutes Can You Use in Loaded Nachos?
Ground Turkey or Lean Beef: Swap the chicken for ground turkey or lean beef for a delightful twist. Season it similarly for that tasty taco flavor.
Cauliflower Crumble: For a low-carb option, cauliflower crumbles can replace chicken. Toss with spices for a wonderful alternative.
Plant-Based Cheese: Going vegan? Use plant-based cheese that melts just like the traditional stuff.
Quinoa: Use seasoned quinoa as a protein-packed layer. It adds a nutty flavor that beautifully complements the nachos.
Zucchini Chips: Switch out the tortilla chips for baked zucchini chips. They’re crispy and lower in carbs, a nice healthy touch!

Conclusion
Are you ready to be the hero of your next gathering? Loaded nachos are sure to steal the show. Whether you follow my recipe to the letter or adapt it to your tastes, you’ll create something unforgettable. This dish is about bringing people together while satisfying that inner craving for cheese and crunchy goodness.
As you dig in, remember: the joy of loaded nachos isn’t just in making them but sharing them with those who matter most. So, grab your favorite toppings, and let’s get nacho-ing!
You’ll also like the following Recipes!

Loaded Nachos – Delicious Meal Ideas
Description
Before we dive into the enchanting world of loaded nachos, let’s talk about what you can serve alongside them to elevate your experience. Think about creamy guacamole—it's a match made in foodie heaven. You could also whip up some delightful jalapeño poppers.
Ingredients
Instructions
Step 1: Prepare the Chicken
-
First, you will cook and shred the chicken breast. This step is crucial because it sets the foundation for the flavor. Use a tablespoon of taco spice mix while cooking—it really amps up the taste. Whether you bake, grill, or pan-sear, make sure it's cooked thoroughly. Once ready, shred it with two forks. Set it aside for now; we’ll come back to it shortly.
Step 2: Preheat Your Oven
-
Preheat your oven to 375°F (190°C). A hot oven is essential for melting the cheese to perfection.
Step 3: Assemble the Base Layer
-
Grab a baking dish or sheet. Scatter the crispy tortilla chips evenly on the bottom. You want a generous layer that will support the toppings.
Step 4: Add the Chicken and Beans
-
Next, evenly distribute the shredded chicken over the chips. Follow that with the black beans. They add a nice protein boost and texture.
Step 5: Layer on the Salsa
-
Spoon the chunky salsa all over the top. This gives everything a flavorful kick and moisture that brings it all together. Sprinkle with the green onions and roasted corn—for extra crunch and a pop of color.
Step 6: Add the Cheese
-
Now, the star of the show: cheese. Pile on that shredded Mexican-style cheese blend. Go generous! It’s nachos after all.
Step 7: Bake the Nachos
-
Place the dish in the preheated oven. Bake for about 10–15 minutes, or until the cheese is nice and bubbly. Keep an eye on it—you want it perfectly melted, not burnt!
Step 8: Finishing Touches
-
Once your nachos are out, sprinkle the fresh cilantro on top. Add pico de gallo for freshness. Top with your desired additional toppings like sour cream, sliced jalapeños, or diced avocado.
Step 9: Serve Hot
-
Dig in while it’s hot. Grab a fork—or just dive in with your hands. Either way, enjoy!
Nutrition Facts
Servings 8
- Amount Per Serving
- Calories 330kcal
- % Daily Value *
- Total Fat 18.5g29%
- Saturated Fat 8g40%
- Cholesterol 40mg14%
- Sodium 462mg20%
- Total Carbohydrate 28g10%
- Dietary Fiber 3g12%
- Sugars 2g
- Protein 14g29%
* Percent Daily Values are based on a 2,000 calorie diet. Your daily value may be higher or lower depending on your calorie needs.
Note
- Choose Quality Tortilla Chips: The foundation matters! Go for sturdy chips that can hold up under pressure.
- Don’t Overload: While it’s tempting to pile on more, too many toppings can lead to a soggy mess. Balance is key.
- Use Fresh Ingredients: Fresh salsa and ripe tomatoes reflect well in taste. Opt for seasonal produce when possible.
- Swap Cheeses: Experiment with different cheeses. Pepper jack adds a spicy kick, while cheddar provides a classic touch.
- Make it Ahead: You can prep your toppings in advance. Store them separately and assemble just before baking!