
This post contains affiliate links. As an Amazon Associate I earn from qualifying purchases.
There’s nothing quite like pulling a warm, butter-laden yeast biscuit from the oven and watching the steam escape. These beauties are the ultimate comfort food—perfect alongside a steaming bowl of broccoli cheese soup or crumbled into a hearty beef and macaroni soup. I can’t wait to cook with you!
Why Grandma’s Kitchen Taught Me Everything About Biscuits
I still remember standing on my grandmother’s kitchen stool at age seven, my hands covered in flour up to my elbows. She’d pull a tray of golden biscuits from her ancient gas oven, and the whole house would fill with this warm, yeasty fragrance that made everything feel safe. She never measured anything precisely—just knew by feel and instinct.
Years later, after earning my credentials as a registered dietitian, I realized what she was actually doing: creating structure through lamination, developing gluten through folding, and understanding the magic of fermentation. This recipe brings together that grandmother wisdom with modern technique, making it accessible for anyone willing to give it a try.

What Makes Yeast Biscuits Different From Regular Biscuits?
Most biscuits rely solely on chemical leaveners—baking powder and baking soda—for their rise. But yeast biscuits? They get their characteristic tender crumb and subtle tang from living yeast that ferments the dough over time. This creates air pockets naturally and develops deeper, more complex flavors than you’ll find in a standard recipe.
The result is something between a traditional biscuit and a dinner roll—a little sturdier than a roll, slightly fluffier than a drop biscuit. The exterior gets gorgeously golden and crispy, while the interior stays pillowy soft. The fermentation also makes them slightly easier to digest for some people, since the yeast begins breaking down the flour’s starches.
What I love most about this version is the combination of instant yeast plus baking powder and baking soda. That triple-lift approach means you get reliable rise every single time, even if your kitchen is cool or your timing isn’t perfect.
Why You’ll Love This Yeast Biscuit Recipe
- Foolproof rise every time – The combination of yeast, baking powder, and baking soda means these biscuits will rise reliably whether your kitchen is warm or cool. I recommend this for busy home cooks who can’t control their environment.
- Make-ahead friendly – You can mix these the night before, refrigerate the dough, and bake fresh the next morning. Perfect for weekday breakfast or Sunday dinner prep.
- Minimal hands-on time – Most of the work is passive proofing. You’ll spend maybe 15 minutes of actual work time, then let time do the heavy lifting.
- Deeply satisfying flavor – That one-hour proof develops subtle yeasty, slightly sweet notes that simple biscuits can never achieve. It’s the difference between a quick snack and a moment of real comfort.
- Professional bakery results at home – The lamination technique (folding the dough) creates those stunning layers you see in restaurant biscuits. It’s easier than it sounds, I promise.
- Budget-friendly ingredients – Everything here is pantry staple. No special equipment, no exotic add-ins needed to make these shine.
The Ingredients
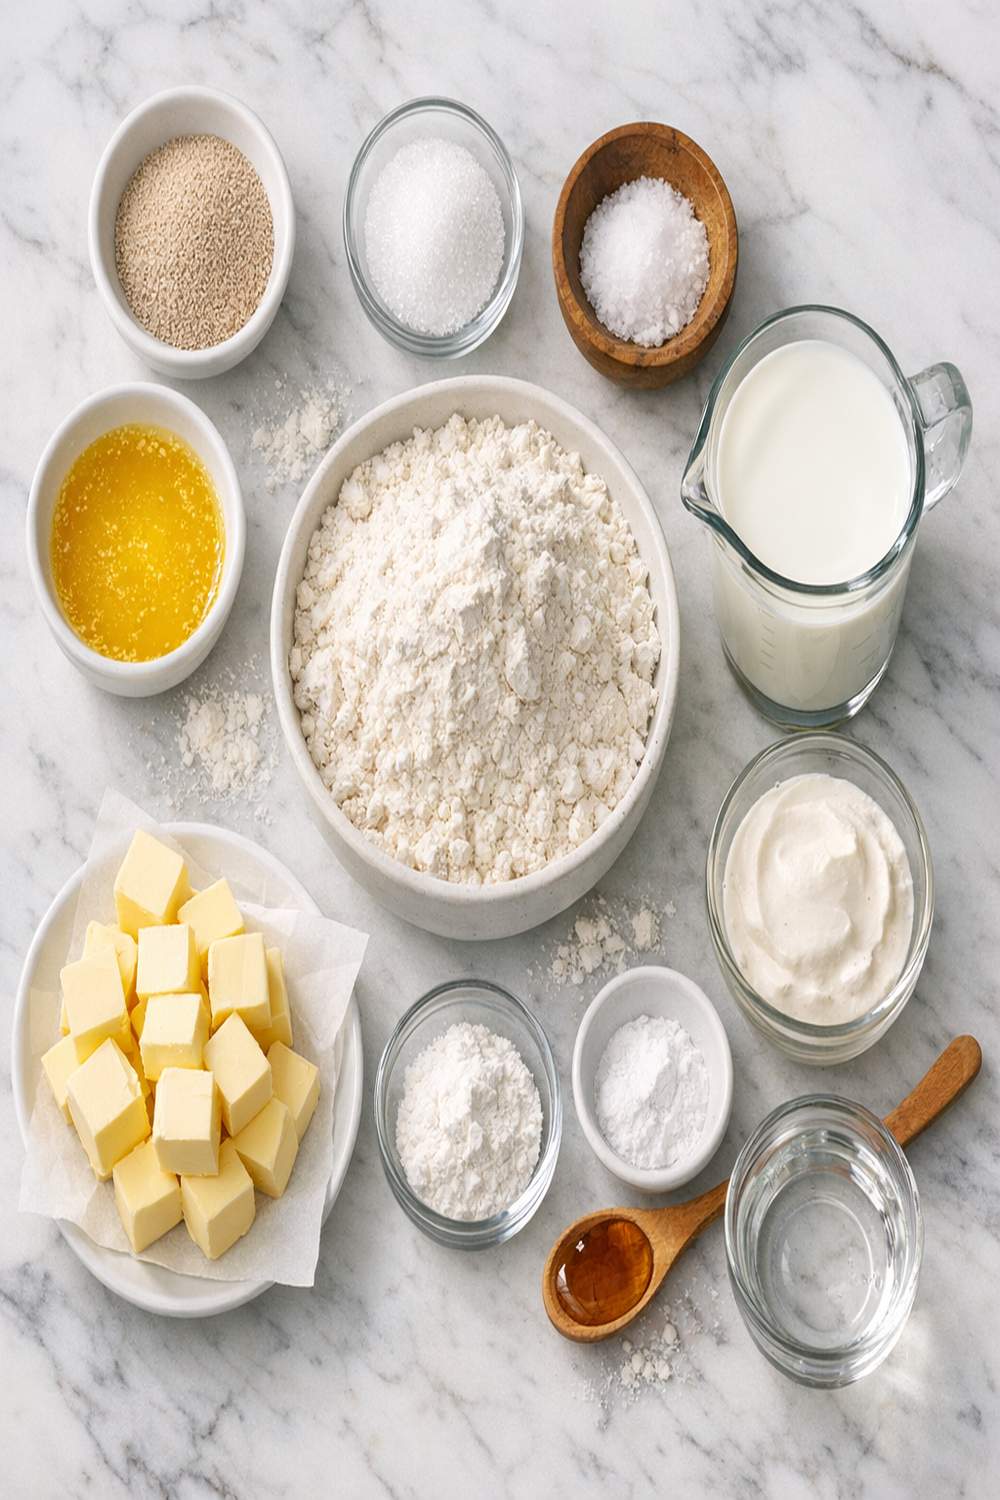
Before we dive in, I want you to know that every single ingredient here serves a purpose. There’s nothing unnecessary. The cream and buttermilk combination gives us tangy flavor and incredible tenderness. The cold butter creates those beautiful layers. And that yeast? It’s what transforms these from good to unforgettable.
- 4½ teaspoons instant yeast (divided into two 2-teaspoon portions plus ½ teaspoon, or use one packet plus ½ teaspoon active dry yeast)
- 1 cup buttermilk (cold, this adds tanginess and tenderness)
- 2 teaspoons baking powder (provides additional rise insurance)
- ¼ cup granulated sugar (feeds the yeast and adds subtle sweetness)
- 1 cup heavy cream (full-fat, cold from the refrigerator)
- 1 teaspoon baking soda (reacts with buttermilk for extra lift)
- 5 cups all-purpose flour (spooned and leveled, never packed down)
- 1 cup cold unsalted butter (cut into small cubes, straight from the refrigerator)
- 2 tablespoons melted butter (for brushing before and after baking, optional but recommended)
- 1 tablespoon fleur de sel or coarse sea salt (for finishing, optional—creates a sophisticated touch)
- ¾ teaspoon fine sea salt (balances sweetness, enhances yeast flavor)
- 3 tablespoons warm water (between 110-115 degrees Fahrenheit—use a kitchen thermometer if you have one)
Yield: Makes approximately 14-16 biscuits, depending on how you cut them.
How to Make These Fluffy Yeast Biscuits
Take your time with this recipe—not because it’s complicated, but because good baking rewards patience. Read through all the steps before starting, gather everything, and set yourself up for success. I like to do this on a weekend morning when I’m not rushed.
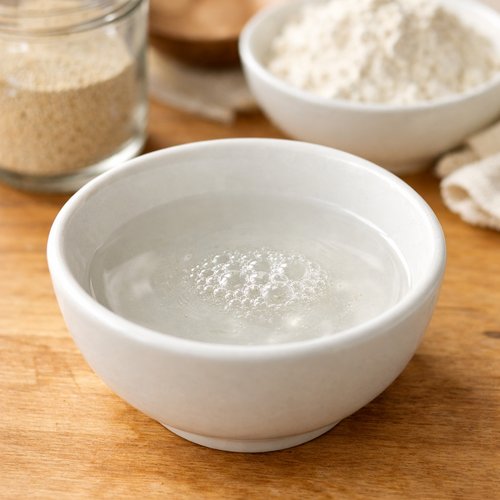
Step 1: Activate Your Yeast
Pour your 3 tablespoons of warm water into a small bowl. You’re looking for water that’s warm to the touch but not hot—about 110-115 degrees Fahrenheit. Too hot and you’ll kill the yeast; too cool and it won’t activate properly.
Sprinkle 4½ teaspoons of instant yeast (or one packet plus ½ teaspoon) over the warm water. Let it sit for about 30 seconds, then stir gently with a fork until you have a smooth paste with no lumps. This step takes maybe one minute. You’re looking for a consistency like thick pancake batter.
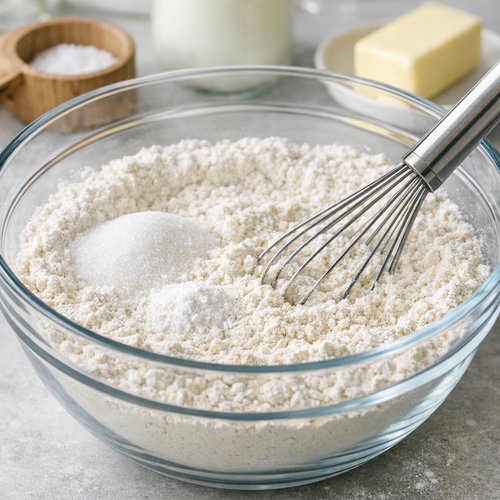
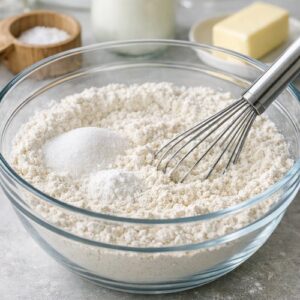
Step 2: Combine Your Dry Ingredients
In a large mixing bowl—I use a 4-quart bowl to give myself plenty of room—whisk together your 5 cups all-purpose flour, ¼ cup sugar, 2 teaspoons baking powder, 1 teaspoon baking soda, and ¾ teaspoon salt. Whisk for about 20-30 seconds to distribute the leavening agents evenly. This prevents you from getting any pockets of pure baking soda flavor in your finished biscuits.
Set this mixture aside for now. You’re building your base.
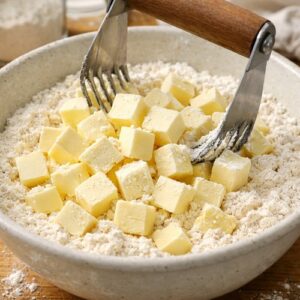
Step 3: Cut in the Butter
Add your 1 cup cold unsalted butter cubes to the dry mixture. This is crucial: the butter must be cold. Cold butter creates steam pockets as it bakes, which gives you those tender layers. I keep mine in the freezer for 10 minutes before cutting it into cubes.
Using your fingertips (yes, your fingers—they’re the best tool), press and flatten each butter piece into the flour, working quickly so the butter doesn’t warm up. You’re aiming for pea-sized pieces throughout. This takes about 3-4 minutes of gentle work. Alternatively, use a pastry blender if you have one, but use your fingers afterward to flatten any larger pieces.
Don’t worry about making it perfect. Some slightly larger pieces are fine—they create wonderful texture variation in your finished biscuits.

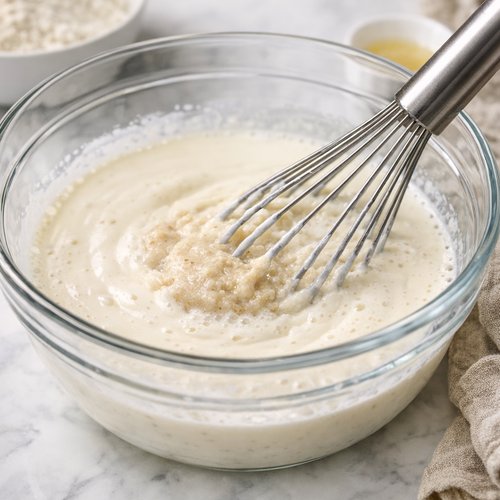
Step 4: Add the Wet Ingredients
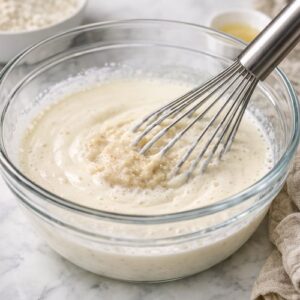
Whisk your 1 cup cold heavy cream and 1 cup cold buttermilk together in a separate bowl. Then, whisk in your yeast paste until fully combined. You’ll have a slightly speckled, tan-colored liquid.
Pour this mixture into your dry ingredients all at once. Using a silicone spatula (not a wooden spoon—silicone gives you better control), mix gently until you see a shaggy dough forming. You want to incorporate most of the visible dry flour, which takes about 45 seconds to 1 minute.
Now use your hands. Gently press the dough together, incorporating any visible lumps. Don’t knead it—just bring it together into a rough, slightly sticky mass. This takes about 30 seconds. Overworking develops too much gluten, which makes tough biscuits instead of tender ones.
Step 5: The Lamination Technique (Creating Those Layers)
Dust your work surface lightly with flour. Turn your shaggy dough out onto it. With floured hands, gently pat the dough into a rough rectangle about ¾ inch to 1 inch thick. Don’t worry about making it perfect—rustic is beautiful here.
Now fold the dough in half, bringing the top edge down to meet the bottom edge. Turn the dough 90 degrees clockwise. Pat it back out to ¾ inch thickness. Fold in half again. Turn 90 degrees and repeat one more time—so three folds total. This entire process should take about 2-3 minutes.
You’re creating layers of butter and dough, just like puff pastry. This is what gives you those gorgeous, crispy exteriors with tender interiors. After your third fold, your dough should be noticeably smoother and more cohesive.

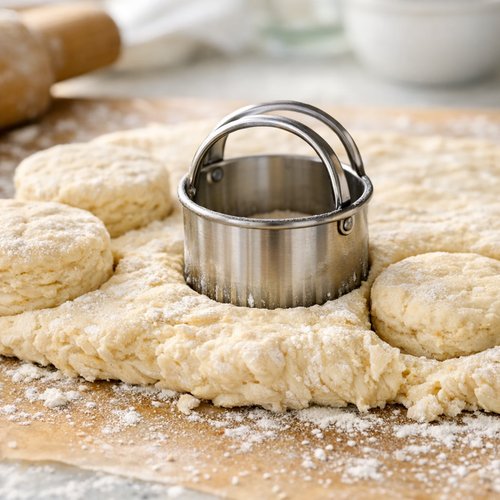
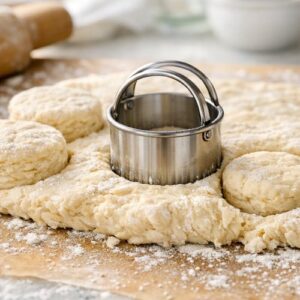
Step 6: Cut Your Biscuits
Pat your folded dough out one final time to about ¾ inch thickness. Using a 2-inch biscuit cutter (or a drinking glass in a pinch), cut straight down—don’t twist, as twisting seals the edges and prevents rising. You should get 14-16 biscuits depending on how close together you cut them.
Gather any scraps, gently pat them back into a disk, and cut additional biscuits. You can repeat this once without a noticeable texture change. (Any extra scraps can be baked as irregular “rustic” biscuits—they still taste delicious.)
Step 7: Arrange and Proof Your Biscuits
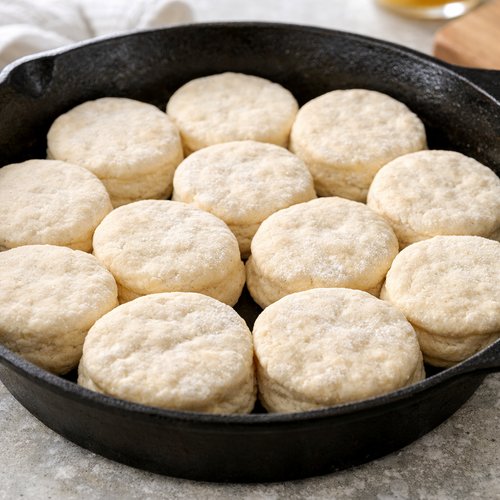
Place your cut biscuits into a 12-inch cast-iron skillet, arranging them so they touch each other—not pressed together tightly, but touching. They should fit snugly in one layer. If you have extra biscuits, use a second skillet or baking sheet.
There’s a reason I recommend cast iron here: it conducts heat beautifully and ensures even browning on the bottoms. If you don’t have cast iron, a standard baking sheet works fine—you may just need an extra minute or two of baking time.
Cover your skillet loosely with plastic wrap. Place it in a warm, draft-free spot. A turned-off oven with the light on works beautifully, or a kitchen corner away from any air conditioning vents. Let the biscuits proof for one full hour. They should increase noticeably in size—roughly 50% bigger than where they started.
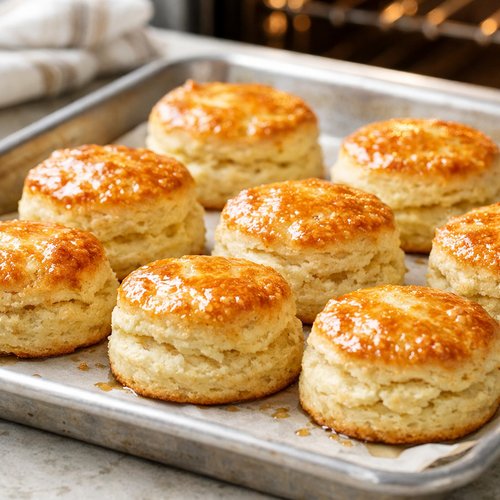
Step 8: Bake Until Golden
About 10 minutes before you’re ready to bake, preheat your oven to 400 degrees Fahrenheit. If you’d like, brush the tops of your proofed biscuits with 2 tablespoons melted butter. This creates a gorgeous golden exterior, though it’s entirely optional.
Place your skillet in the preheated oven and bake for 16-18 minutes. You’re looking for the tops to turn a deep golden brown, and the biscuits should feel firm when you gently touch them. The bottoms should be similarly golden—this is why cast iron is perfect; you can often see the beautiful color right through the pan.
If you want extra richness, brush the warm biscuits with an additional tablespoon of melted butter immediately after removing from the oven. A light sprinkle of fleur de sel on top adds a sophisticated, bakery-quality touch.
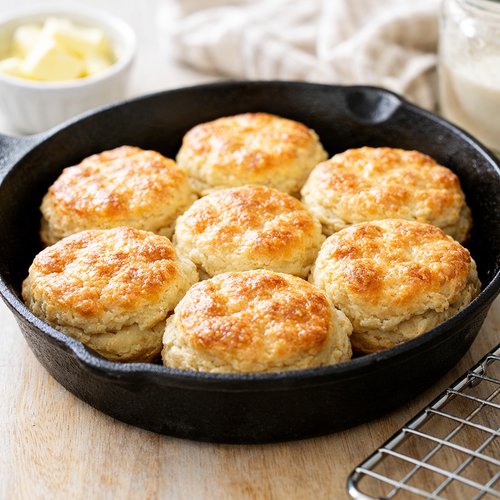
Step 9: Cool Slightly Before Serving
Let your biscuits cool in the skillet for about 10 minutes. They’ll firm up slightly, making them easier to handle. Then transfer to a cooling rack if you have one, or simply enjoy them warm from the skillet.
These biscuits are absolutely best served warm, within the first 2-3 hours of baking. That’s when the interior is still steamy and the exterior is at its crispiest.
Tips and Tricks From My Kitchen to Yours
- Warm water temperature is non-negotiable – I use an instant-read thermometer to check my water. It’s the single most important factor for reliable yeast activation. If your water is too hot (above 120 degrees), you’ll kill the yeast. Too cool and nothing happens. Aim for 110-115 degrees Fahrenheit.
- Cold ingredients create tender biscuits – Keep your cream, buttermilk, and butter cold right up until mixing. I even chill my mixing bowl for 10 minutes before starting if my kitchen is warm. Cold butter creates steam pockets; cold liquids prevent overdevelopment of gluten.
- Don’t skip the folding step – Those three folds are what create the restaurant-quality layers. It only adds 3 minutes but transforms the texture completely.
- Biscuits touching each other during proofing helps them rise upward, not outward – This creates taller, fluffier biscuits. If they’re separated, they’ll spread sideways instead of up.
- A cast-iron skillet holds heat incredibly evenly – If you don’t have one, a well-seasoned cast iron is worth the investment for so many recipes. For this one, it guarantees beautiful browning on the bottom, which is harder to achieve on a standard baking sheet.
- Don’t twist when cutting with your biscuit cutter – Twisting seals the cut edges, which prevents the biscuit from rising properly. Cut straight down with a quick, confident motion.
- The one-hour proof is worth every minute – I know it feels long, but that’s when the yeast develops flavor and creates structure. Rush this step and you’ll get decent biscuits; honor it and you’ll get magic.
- Save your scraps for staff meals – Any trimmed dough can be gently patted back into a disk and recut. The texture is slightly different but still delicious, and waste is eliminated.
Expert’s Nutritional Insight: Why These Biscuits Support Better Digestion
As a registered dietitian, I’m particularly excited about one aspect of this recipe that most people overlook: the fermentation. When yeast ferments dough over that one-hour proof, it begins breaking down the starches and proteins in the flour through enzymatic action. This pre-digestion means your body has to do less work when you eat these biscuits compared to non-fermented quick biscuits.
Additionally, the combination of buttermilk and heavy cream provides probiotics and fat-soluble vitamins (like vitamins A, D, E, and K) that support nutrient absorption. The butter, while higher in saturated fat, also contains short-chain fatty acids that may support gut health. This isn’t health food, but it is thoughtfully constructed.
Each biscuit provides approximately 280 calories, 15 grams of fat, 32 grams of carbohydrates, and 4 grams of protein. That’s a satisfying ratio that will keep you full longer than a carbohydrate-heavy breakfast pastry.
Can I Store and Make Ahead With These Biscuits?
Absolutely—and I do this all the time for busy weekday mornings.
Refrigerator storage (for unbaked dough): After you cut your biscuits and arrange them in the skillet, cover them with plastic wrap and refrigerate instead of proofing at room temperature. They’ll proof slowly in the cold overnight—this is actually wonderful for flavor development. The next morning, remove from the refrigerator and let them sit at room temperature for 20-30 minutes while you preheat your oven. They’ll have some rise already; just bake as usual. The cold fermentation creates deeper, more complex yeast flavors.
Refrigerator storage (for baked biscuits): Cooled biscuits keep well for 3-4 days in an airtight container. To reheat, wrap in foil and warm in a 350-degree oven for 8-10 minutes. They’ll revive beautifully.
Freezer storage (unbaked dough): Cut and arrange your biscuits, then freeze them uncovered on a baking sheet for 2 hours. Once solid, transfer to a freezer bag. They’ll keep for up to 3 months. Bake from frozen—add 4-5 extra minutes to baking time, and they’ll taste nearly identical to fresh-baked.
Freezer storage (baked biscuits): Completely cooled biscuits freeze beautifully for up to 2 months. Reheat from frozen in a 350-degree oven, covered with foil, for 12-15 minutes.
My personal favorite: freeze the unbaked dough and bake fresh whenever you want. There’s nothing like the aroma of fresh biscuits baking while you’re making morning coffee.
Nutrition Information Per Biscuit
Based on USDA data for all ingredients (yields approximately 15 biscuits):
- Calories: 280
- Total Fat: 15 grams (saturated fat: 9 grams)
- Cholesterol: 42 milligrams
- Sodium: 185 milligrams
- Total Carbohydrates: 32 grams (dietary fiber: 1 gram, sugars: 3 grams)
- Protein: 4 grams
These biscuits provide excellent source of B vitamins (thiamine, niacin, and folate) from the enriched flour. The butter and cream provide fat-soluble vitamins A, D, and E, which support absorption of nutrients from other foods you eat alongside them.
What Can I Serve With These Golden Yeast Biscuits?
These biscuits are incredibly versatile. They’re beautiful served warm with good butter and jam at breakfast, but they truly shine as a dinner companion. Here are my favorite pairings:
- Warm with soup – A bowl of broccoli cheese soup with a warm biscuit is lunch perfection. The tender crumb soaks up the creamy goodness without falling apart.
- Alongside roasted chicken or turkey – Serve with pan gravy for dunking. The yeasty flavor complements poultry beautifully.
- With sliced ham and sharp cheddar – For a simple but elegant lunch, slice a warm biscuit and add thin slices of quality ham and aged cheddar. Add a little sharp mustard if you like.
- Breakfast sandwiches – Split a warm biscuit and add scrambled eggs, crispy bacon, and sharp cheddar. The tender crumb is perfect for holding without falling apart.
- Split and stuffed with creamed chicken or turkey – A classic comfort food approach that works beautifully.
- Beside a beef and macaroni soup – The hearty soup and tender biscuit combination is pure nostalgia and nourishment.
- Spread with butter and a touch of honey – For an afternoon snack with coffee, nothing beats a warm biscuit with local honey.
- Crumbled into salads – Unusual but delicious—crumbled biscuit adds wonderful texture and substance to hearty winter salads.
Substitutes and Variations
- Active dry yeast instead of instant yeast – You can use active dry yeast in a 1:1 ratio, but increase your proofing time to 75 minutes since it rehydrates more slowly. The flavor will be slightly more pronounced—not better or worse, just different.
- Whole wheat flour blend – Substitute up to 1 cup of the all-purpose flour with whole wheat flour. Your biscuits will be denser and nuttier, with about 1 additional gram of fiber per biscuit. You may need to add 1-2 extra tablespoons of liquid since whole wheat absorbs more moisture.
- Half-and-half instead of heavy cream – This will yield slightly less rich biscuits but still delicious. Use the same amount.
- Milk instead of buttermilk – If you don’t have buttermilk, use regular milk and add 1 tablespoon of lemon juice or white vinegar. Let it sit for 5 minutes to curdle slightly. This creates a similar tangy flavor profile.
- Herbs and cheese variation – Add 1 teaspoon of dried thyme or Italian seasoning, and fold in ½ cup of grated sharp cheddar or Gruyère cheese after your lamination folds. The cheese adds wonderful umami depth.
- Honey instead of sugar – Substitute ¼ cup sugar with 3 tablespoons honey. This creates slightly more caramelization and a more complex sweetness. The texture will be marginally more tender.
- Cottage cheese addition – For extra tanginess and protein, substitute ½ cup of the buttermilk with blended cottage cheese mixed with ½ cup milk. This creates a slightly richer crumb and adds about 1 additional gram of protein per biscuit.
Common Mistakes to Avoid
- Warm water that’s too hot (above 120 degrees) – This kills the yeast before it can work. Dead yeast = no rise. Use a thermometer. This is non-negotiable.
- Skipping the one-hour proof or cutting it short – I see this often with impatient bakers. The proofing isn’t just about rise; it’s about flavor development. Rushing this creates biscuits that taste like standard biscuits, losing the advantage of the yeast entirely. Honor the time.
- Overworking the dough after adding wet ingredients – This develops too much gluten, making tough biscuits instead of tender ones. Mix just until combined, then stop. Your biscuits will thank you.
- Warming your butter pieces during lamination – If your kitchen is warm, work quickly and keep your hands cool. Warm butter gets incorporated into the dough instead of creating layers, defeating the purpose of the folding technique.
- Twisting when you cut biscuits – Twisting seals the edges, which prevents proper rising. Use a straight downward cutting motion.
Seasonal Variations and Adaptations
Spring: Add the zest of one lemon and 1 tablespoon of fresh lemon juice (reducing the buttermilk by 1 tablespoon). Add 2 tablespoons of finely minced fresh tarragon or chives folded in after the lamination. These bright, herbaceous biscuits pair beautifully with spring soups and lighter meals.
Summer: Add ¼ cup of fresh corn kernels (finely chopped) and ½ cup of grated sharp white cheddar folded in after lamination. Omit the sugar entirely if you prefer savory. Brush with herb-infused butter (butter mixed with fresh basil and thyme). Perfect alongside summer salads and grilled vegetables.
Fall: Add 1 teaspoon of cinnamon, ½ teaspoon of ground nutmeg, and ¼ teaspoon of ground cloves to your dry ingredients. Add ¼ cup of finely minced candied ginger or 2 tablespoons of maple syrup. These warm-spiced biscuits are stunning with autumn squash soups and roasted root vegetables.
Winter: Add 1½ teaspoons of caraway seeds or fennel seeds to your dry ingredients. Add the zest of one orange. These savory, sophisticated biscuits are perfect with hearty winter stews, braised meats, and root vegetable soups. They also make wonderful bread for traditional Christmas morning breakfast.
Yeast Biscuit Recipe
Ingredients
Method
- Pour your 3 tablespoons of warm water into a small bowl. You're looking for water that's warm to the touch but not hot—about 110-115 degrees Fahrenheit. Too hot and you'll kill the yeast; too cool and it won't activate properly. Sprinkle 4½ teaspoons of instant yeast (or one packet plus ½ teaspoon) over the warm water. Let it sit for about 30 seconds, then stir gently with a fork until you have a smooth paste with no lumps. This step takes maybe one minute. You're looking for a consistency like thick pancake batter.

- In a large mixing bowl—I use a 4-quart bowl to give myself plenty of room—whisk together your 5 cups all-purpose flour, ¼ cup sugar, 2 teaspoons baking powder, 1 teaspoon baking soda, and ¾ teaspoon salt. Whisk for about 20-30 seconds to distribute the leavening agents evenly. This prevents you from getting any pockets of pure baking soda flavor in your finished biscuits. Set this mixture aside for now. You're building your base.
- Add your 1 cup cold unsalted butter cubes to the dry mixture. This is crucial: the butter must be cold. Cold butter creates steam pockets as it bakes, which gives you those tender layers. I keep mine in the freezer for 10 minutes before cutting it into cubes. Using your fingertips (yes, your fingers—they're the best tool), press and flatten each butter piece into the flour, working quickly so the butter doesn't warm up. You're aiming for pea-sized pieces throughout. This takes about 3-4 minutes of gentle work. Alternatively, use a pastry blender if you have one, but use your fingers afterward to flatten any larger pieces. Don't worry about making it perfect. Some slightly larger pieces are fine—they create wonderful texture variation in your finished biscuits.
- Whisk your 1 cup cold heavy cream and 1 cup cold buttermilk together in a separate bowl. Then, whisk in your yeast paste until fully combined. You'll have a slightly speckled, tan-colored liquid. Pour this mixture into your dry ingredients all at once. Using a silicone spatula (not a wooden spoon—silicone gives you better control), mix gently until you see a shaggy dough forming. You want to incorporate most of the visible dry flour, which takes about 45 seconds to 1 minute. Now use your hands. Gently press the dough together, incorporating any visible lumps. Don't knead it—just bring it together into a rough, slightly sticky mass. This takes about 30 seconds. Overworking develops too much gluten, which makes tough biscuits instead of tender ones.
- Dust your work surface lightly with flour. Turn your shaggy dough out onto it. With floured hands, gently pat the dough into a rough rectangle about ¾ inch to 1 inch thick. Don't worry about making it perfect—rustic is beautiful here. Now fold the dough in half, bringing the top edge down to meet the bottom edge. Turn the dough 90 degrees clockwise. Pat it back out to ¾ inch thickness. Fold in half again. Turn 90 degrees and repeat one more time—so three folds total. This entire process should take about 2-3 minutes. You're creating layers of butter and dough, just like puff pastry. This is what gives you those gorgeous, crispy exteriors with tender interiors. After your third fold, your dough should be noticeably smoother and more cohesive.

- Pat your folded dough out one final time to about ¾ inch thickness. Using a 2-inch biscuit cutter (or a drinking glass in a pinch), cut straight down—don't twist, as twisting seals the edges and prevents rising. You should get 14-16 biscuits depending on how close together you cut them. Gather any scraps, gently pat them back into a disk, and cut additional biscuits. You can repeat this once without a noticeable texture change. (Any extra scraps can be baked as irregular "rustic" biscuits—they still taste delicious.)
- Place your cut biscuits into a 12-inch cast-iron skillet, arranging them so they touch each other—not pressed together tightly, but touching. They should fit snugly in one layer. If you have extra biscuits, use a second skillet or baking sheet. There's a reason I recommend cast iron here: it conducts heat beautifully and ensures even browning on the bottoms. If you don't have cast iron, a standard baking sheet works fine—you may just need an extra minute or two of baking time. Cover your skillet loosely with plastic wrap. Place it in a warm, draft-free spot. A turned-off oven with the light on works beautifully, or a kitchen corner away from any air conditioning vents. Let the biscuits proof for one full hour. They should increase noticeably in size—roughly 50% bigger than where they started.

- About 10 minutes before you're ready to bake, preheat your oven to 400 degrees Fahrenheit. If you'd like, brush the tops of your proofed biscuits with 2 tablespoons melted butter. This creates a gorgeous golden exterior, though it's entirely optional. Place your skillet in the preheated oven and bake for 16-18 minutes. You're looking for the tops to turn a deep golden brown, and the biscuits should feel firm when you gently touch them. The bottoms should be similarly golden—this is why cast iron is perfect; you can often see the beautiful color right through the pan. If you want extra richness, brush the warm biscuits with an additional tablespoon of melted butter immediately after removing from the oven. A light sprinkle of fleur de sel on top adds a sophisticated, bakery-quality touch.

- Let your biscuits cool in the skillet for about 10 minutes. They'll firm up slightly, making them easier to handle. Then transfer to a cooling rack if you have one, or simply enjoy them warm from the skillet. These biscuits are absolutely best served warm, within the first 2-3 hours of baking. That's when the interior is still steamy and the exterior is at its crispiest.

Notes
FAQs About Yeast Biscuits
Can I use this recipe without the yeast and just use baking powder and baking soda?
Technically yes, but you’d be missing the entire point. Without yeast, these become very similar to standard biscuits, losing the subtle tang, complex flavor, and tender crumb that fermentation provides. If you want a quick biscuit without yeast, try the 7-Up biscuit recipe instead—it’s delicious in its own right but is an entirely different thing.
What if my biscuits don’t rise during proofing?
This usually means your yeast was dead (water was too hot) or your proofing space was too cold. In the future, use a thermometer for your water and proof in a warm spot—a turned-off oven with the light on is perfect, reaching about 75-80 degrees inside. If this happens now, you can still bake them; they’ll be flatter than ideal but should still taste decent. Learn from it and try again.
Can I use instant yeast and active dry yeast interchangeably?
Mostly yes. Instant yeast (also called bread machine yeast) has finer particles and rehydrates faster. Active dry yeast has larger granules and takes slightly longer. Use them in a 1:1 ratio, but extend your proofing time by about 10-15 minutes if using active dry yeast. The flavor will be nearly identical.
Why do my biscuits spread sideways instead of rising up?
Usually because they weren’t touching during proofing. When biscuits touch each other, they’re forced to rise upward because they can’t expand sideways. Arrange them so they’re just barely touching—not pressed together, but definitely in contact with each other. Also ensure your dough isn’t too warm during proofing; if it’s too warm, the dough gets too soft to support vertical rise.
Can I make these in advance and reheat them?
Absolutely. Baked biscuits keep for 3-4 days in an airtight container and reheat beautifully. Wrap in foil and warm in a 350-degree oven for 8-10 minutes. They’ll taste nearly as good as fresh-baked. Even better: freeze unbaked biscuits and bake fresh whenever you want.
More Recipes You’ll Love
- Cinnamon Rolls – Another yeast-forward recipe with that same tender, yeasted crumb. If you nail these biscuits, you’re ready for cinnamon rolls.
- Homemade Glazed Doughnuts – A sweeter application of fermented dough that uses similar techniques for that pillowy texture.
- How to Bake a Potato – A simple foundation recipe that pairs beautifully alongside these biscuits at dinner time.
There you have it—the complete guide to making yeast biscuits that taste like they came from a professional bakery. These are the biscuits I make when I want to show someone I love them through food. They’re not complicated; they just require a little patience and attention to detail.
The magic isn’t in some secret ingredient or complicated technique. It’s in honoring the process: cold butter, warm yeast, the transformative power of lamination, and time. When you bring those elements together, you get something truly special.
Make these for your own table soon. Serve them warm, slathered with good butter, and watch people’s faces light up. That’s the real reward. Enjoy!